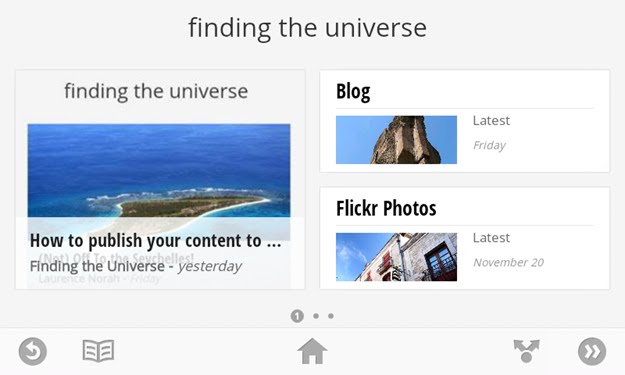
In today’s technology themed post I’m going to explain how to publish content to Google Currents. First though – what is Google Currents?
Google Currents is a new product from Google. It’s an application for smartphones and tables running either Android or iOS which allows you to consume content offline in an elegant way – much like Flipboard already does for iOS devices. It’s a bit like an RSS reader, only on some serious steroids.
Google Currents main advantage over a traditional RSS reader is the fact that you can pull content from all sorts of different sources, such as a twitter feed or website, and present it all to your readers in one neatly packaged application.
Google Currents launched with a heap of big name publishers all on board, ready for consumption. But the good news is that Google Currents isn’t an exclusive platform – anyone with content can have it published into the app. And it’s easy to make it look good. In today’s post, I’m going to show you just how you can do that, including how to add your twitter and Facebook pages into your finished publication.
To complete this walkthrough you are going to need a Google account. Since these are almost a prerequisite for using the web these days, I’m going to assume you have one. For publishing content from a website, the overall process is easier if your site is registered with Google Webmaster tools. However this isn’t mandatory, as you can verify your content when you come to the publication step.
Finally, you’ll also need to be using Google Chrome, as Google Currents Producer doesn’t, as of writing, support other browsers (thanks to commenter Rich for pointing this out!).
Note that as of writing the Google Currents application is only available to folks in the US. However you can create content for publication from anywhere, you just won’t be able to read it yourself.
Getting started with Google Currents
Head over to the Google Currents Publisher website, which can be found at: https://www.google.com/producer/home, and sign in with your Google Account.
Next, you will need to agree to the terms of service as a publisher to Google Currents, by ticking the box, and filling in some details, then hitting continue. Once you press continue, you are presented with a screen that allows you to create a new edition, like the one below.
The only thing you need to fill in at this point is the name of your edition – what your content is going to be called. I put Finding the Universe in mine. Don’t worry about agonising over this too much – it can be changed later.
If you have an RSS feed from your blog to hand, or a Youtube channel, then you can add these at this point. However as all this can be edited from inside the application, so skip those for now and just hit the big Create button.
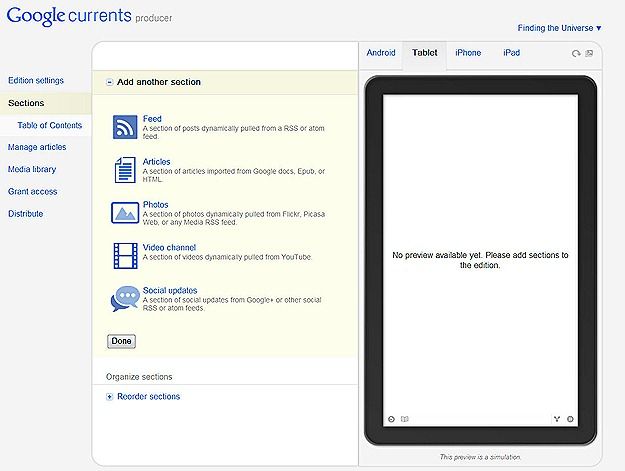
Some spinning wheels later, and you will arrive at the main Google Currents Producer page, which looks like this.

Adding your content
This is where all the magic happens. You will notice a number of menu options down the left hand side. Edition settings, where you will have landed, lets you change things like what your edition is called, should you have messed up in the initial stages.
You can also add things like an icon or splash image for your edition, as well as integrate your product into Google Analytics. All things that are worth doing. But before you start tracking your users, you are going to want to offer them some content! We’ll do that now.
From the left hand menu, select the second option down, Sections.

Here is where you can add all your content, from RSS feeds to social updates. I’m going to assume to start with that you have a blog with an RSS feed that you want to publish to Google Currents. If you don’t, or want to publish images or social updates instead, you can skip this section, and move down to instructions for integrating Flickr streams, Twitter updates or Facebook page contents.
Adding a webpage feed to Google Currents
Within “sections” on the left hand panel, choose “add another section”, then click the very top option, “Feed”.
You will be presented with the following screen.
The first thing you need to do is give this section a title. For this example I’ll be adding the feed from this site, my blog. I’m going to imaginatively call this “blog”.
Next, you need to enter the address of your RSS feed. If you use feedburner to manage your feed then the feedburner address will do. Otherwise, look in your blog settings to find your feed URL. Paste your feed URL into the second box.
The last option, “Feed options”, allows you to configure how Google Currents grabs your feed content. If you publish a full feed, then the first option will be fine. If you only publish a partial feed, then the second option, “Generate articles from source url”, is the one to pick.
Here’s what my filled in box looks like. Once you’ve got it all filled in, hit the Create button!
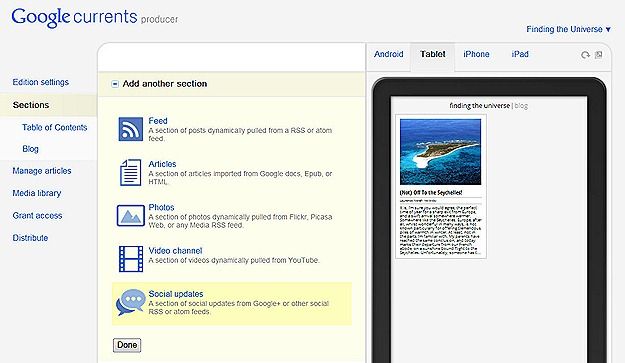
If all goes well, a box will pop up to say that your feed has been created. You will be taken back to the main page of Google Currents producer where the preview application should have popped up with a preview of what your application may start to look like. You can experiment with the different emulators to see how it renders on different devices, from Android smartphones to iPads, by clicking the tabs along the top right hand side of the page.
You could pretty much finish now – and if all you wanted to do was add your blog feed RSS to Google Currents, then you can skip to the section on publication.
However to do so would be a bit of a shame, because one of Google Currents great features is its ability to aggregate all sorts of your content into one place. Your readers no longer need to access multiple sites to see all the great work you are doing – now they will be able to see it all from one place! Lets assume you have a Facebook page for your blog or product, and add that now.
Adding a Facebook Page to Google Currents
Click the main Sections button from the left hand menu, and choose the Social Updates icon near the bottom.

You will be presented with the following screen:
First, you’ll want to give this section a name. As this is a Facebook page, the title Facebook Updates isn’t too bad. Again, this isn’t set in stone, so don’t worry about it too much.
Next, you’ll want to pick your source. From the drop down box, you’ll quickly notice that Facebook Page isn’t currently an option. Nor in fact, is any other social medium other than Google+. Hopefully future revisions of this tool will recognise that there is a social web beyond Google+, but for now, we have to make do, and use the RSS feed option.
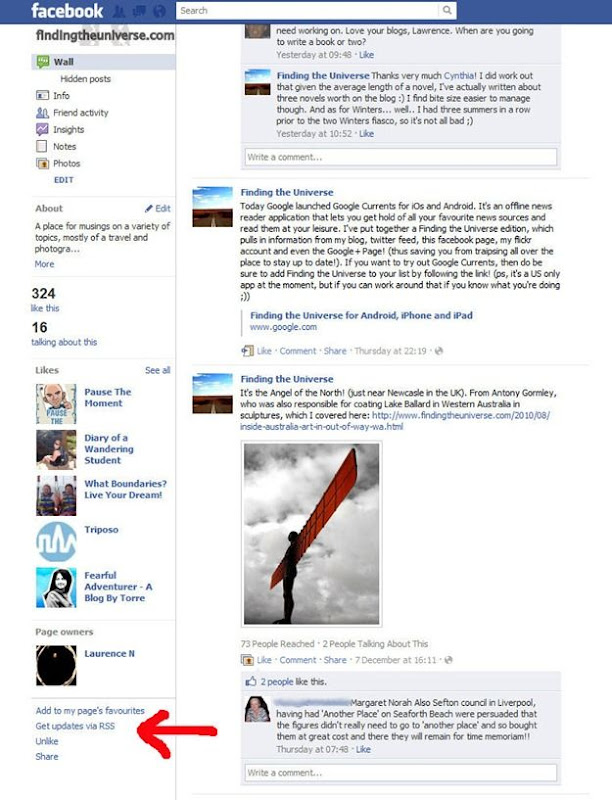
Handily, your Facebook page generates an RSS feed of your wall content. To find out the address, head on over to your Facebook page. For me, that’s http://www.facebook.com/findingtheuniverse. Scroll down a bit, in the left hand menu near the bottom should be a “Get updates via RSS” link, as per the screenshot below. You will want to right click that, and copy the link address.

The link should that you copy should look along the lines of: https://www.facebook.com/feeds/page.php?id=128474613858243&format=rss20
Back in Google Currents, you can paste this into the RSS box as follows:
Once you’re done, press Create, and wait as Currents does its magic.
All being well, your sections should now have at least three parts, a table of contents, a section representing your blog, and one representing your Facebook Page.
Adding other sections is as easy as repeating this process for other content. For a Google+ Page, repeat the process as described for a Facebook page, but instead pick Google+ as the source, and just paste in your profile URL. This works for both Google+ personal profiles and Google + Pages.
Next we’ll add a photo stream to your edition.
Adding a Flickr Stream to Google Currents
Choose “Sections” from the left hand menu of Google Currents, then pick the “Photos” option from the right hand options.
You will again be greeted by the now familiar “add new section” box, with a number of photo sources to choose from, including Flickr, Picasa Web and Google Images. To add a Flickr account simply title the section “Flickr” or “Photos”, select Flickr as the photo source, and enter your Flickr username into the user account field.
If you wanted to only have specific content from your Flickr photostream pulled into the application, you could add words into the last box to act as filters. Otherwise leave this field blank to import all your photos. Once you are happy, press Create at the bottom, and let Google Currents do some importing magic!
And that is Flickr. By now you should be getting the hang of adding sections to your edition. You can repeat this process for Videos (which only lets you pull content from Youtube for now).
Adding a Twitter stream to Google Currents
Twitter is perhaps the hardest piece of social content to integrate into Google Currents, largely because Twitter doesn’t make it obvious where the RSS feed of your tweets is. But don’t worry, it is there, if you know where to look.
To add a twitter stream to Google Currents, repeat the process you went through for adding a Facebook Page, choosing Social Updates, and selecting “RSS or atom feed” as the source.
In the RSS feed section, enter the following:
https://api.twitter.com/1/statuses/user_timeline.rss?screen_name=lozula
Replace the “screen_name=lozula”, which is my twitter username, with your twitter username, whatever that is. If it was bob, then you’d have something that looked like
https://api.twitter.com/1/statuses/user_timeline.rss?screen_name=bob
Your finished section should now look like this:
Hit Create. And that’s twitter added!
Publishing your Google Currents Edition
By now you should have some content added to your Google Currents Edition. Feel free to play around and add more content, or use the sections tool to re-order and edit what you have already added. The user interface is very intuitive, and once you have played with a few things, it should be fairly obvious as to what you are doing.
The next big thing of course is to get your content from draft status out into the real world, in published form, so people can actually read it.
To do this, you need to go to the Distribute menu option, at the bottom of the left hand menu.
Here you are presented with a number of options. You can test out your app, prior to publication, on either Android, iPhone or iPad, if you live in the US.
If you do have access to the Google Currents App, I’d recommend following the instructions in these sections for these devices to ensure that your publication looks how you want it to. Don’t worry though if you find flaws later on, as you can still edit it after it’s published.
Before you can publish your edition, you do need to verify that the content is owned by you, by choosing the third option down in the distribute section: “Verify Content Ownership”.
Press the “Verify” link on the right hand side. If you are logged in with the same Google Account that you use for Google Webmaster tools, this should happen seamlessly. If not, you will be redirected to Google Webmaster Central to link the website to your Google Account.
Once verification is complete, Press “Done” on the above screen. This step may not be mandatory.
Once Verification is complete, you will see a screen like the above. Now it is time to Distribute your edition! Note you can only distribute after verification is complete, which may take a little bit of time to happen.
Press “Distribute to Google Currents”. From the drop down section, choose a publication date, and then press publish. (Note, if you are running any kind of adblocking software, you may have problems accessing this part of the process. Disable the adblocker to proceed if you encounter problems). All being well, you will be greeted with the following screen:
Congratulations! Your content is now available on Google Currents. The link provided is the public link you should direct your readers to to find your content. For this blog, that’s:
http://www.google.com/producer/editions/CAowl90C/finding_the_universe
I hope you found this tutorial useful! If you’ve got any questions or comments, do post them in the comments below!


0 comments:
Post a Comment