Related Posts Plugin for WordPress, Blogger...
Showing posts with label Technology. Show all posts

Friday, May 4, 2012

Dear future technology: a travellers wishlist

The future is bright and full of dandelions

Today, I’m going to do one of my rare technology themed posts. I’m writing about what I’d like to see from my technology in the coming years. Don’t worry. I’ll be back to talking about the rest of the world’s awesomeness soon enough.

I’m not one to complain. I already have the equivalent of a 1970’s supercomputer available to me in my pocket (there’s a joke there somewhere), with a great percentage of the worlds knowledge available a mere few screen taps away.

I can call friends around the world for free, with video. I can control my bank accounts, book flights, find my way, get restaurant recommendations, look up the weather, and learn how to build a fire with nothing but a bucket of water.

Ok, that last one I made up. Hopefully my point is made. We live in an incredible time. But there’s nothing wrong with a bit of dreaming. So. If I was in charge of a giant tech company, with billions of dollars sitting around, wondering how to make a travellers life easier, this is the sort of thing I might be thinking of doing. As well as driverless cars that is. And clean drinking water and free healthcare for all. You know, the little things...

Near-instant wireless charging

trippy lights

When travelling, you can’t escape the need to take some devices with you. Be they cameras, phones, laptops, e-readers or music players (or one device that does all of the above properly, come on world... let’s get moving on this convergence thing!), they all have the same thing in common, a requirement for power.

One thing that doesn’t appear to have kept up with the pace of technological change is the humble battery.

Firstly, there is no universally accepted charging solution, which means taking a mass of wires with you when you travel. Second, devices take time to charge. Promises of “fast charge” batteries have been around for a while, but as yet not delivered.

The future, therefore, should fix both of these complaints. First, I want to be able to charge my devices wirelessly. This technology exists, but it’s not exactly a common standard as yet, plus it’s darn slow. I want charging to happen very quickly, ideally in less than a minute.

I hope for a future where power charging pads are like vending machines, available all over the place. You take your fading device, pop a credit in the unit, hold your device against the charge pad, and moments later, you are ready to rock, all charged up. With a charge that lasts more than a day. Can’t be that hard. Right?

Real-time translation

Foreign symbols on rock

Communication is important. It would be so nice to have a little yellow fish I pop in my ear that automatically translated everything I heard, but that’s somewhat unlikely to happen. What is more likely, is that a smartphone app evolves to let this happen.

Currently, Google translate works to a point. And Microsoft are working on this one too. Both options currently require a connection to the internet, which isn’t generally available in all the places you want to translate things. (That is another point, but I’m ok if the technology folks roll out clean drinking water for all before free internet for all.)

Of all my future dreams, I think this one may come true first. Then I’ll be able to order beer everywhere I go, and even understand how much I’m supposed to pay for it! Hurrah!

A single universally accepted payment option

In every science fiction novel ever, there is a universally accepted payment option, usually known as a credit. A single world currency would be a utopian solution, but even just one form of payment that is accepted everywhere would be nice.

And yes, I’d like it to be something electronic too. Because nice though sacks of beans or gigantic triangular rubber coins are, they do have some impracticalities when it comes to ease of packing. Google Credits. Apple iCredits. I can almost taste their electronic goodness.

Electronic paperwork

Rock art hand

One thing you can’t escape when travelling is the need for documentation. A passport is the most important bit of paperwork, but you probably also carry all kinds of other bits of paper with you. From insurance receipts to booking confirmations to other forms of ID, it all adds up.

I’d like all this to be replaced by something less tangible. Various attempts at biometric ID have come and gone. For a while you could sign up to enter and leave the UK using a retinal scanner. The future was here!

Sadly, technology revolutions don’t seem to happen entirely overnight. Or for free. That system is being canned, presumably because passports are still what everyone in the world uses. So whilst my passport has a chip in it, and is terribly Passport 2.0 in that sense, I’d really like to not have it at all. Because if I lose it, for some reason I am no longer me to the border authorities. Which just seems wrong. So yes. I want to be my own document. Surely there is some part of me unique enough that I can be identified by it…

Virtual addresses

floating lights

When you travel long term, not having an address or permanent base can start to become a serious hindrance. The world does not seem to be entirely set up for people who don’t have some form of postal address. The common solution is to use a friends address… or that classic fallback, a parents address. (Also useful for long term storage of all those things you couldn’t bring yourself to throw away.)

This does seem rather ridiculous though, as you’re not actually living there. It’s a loophole in a flawed system. If only there was some way to have an address that large institutions actually recognised as being linked to you, without the need for actual bricks and mortar. Like.. an electronic mail address, to which “electronic” versions of documents could be sent. It could be called.. “e”mail. Patent pending on that one folks.

Well, that’s what I’m hoping the not too far off future may hold from a travellers technology viewpoint. As well as flying cars of course. And teleporters. And space flight.

Got a wish for some future technology that would make your travels or life easier? Do share below!

Sunday, December 11, 2011

How to publish your content to Google Currents

screenshot-1324291953246

In today’s technology themed post I’m going to explain how to publish content to Google Currents. First though – what is Google Currents?

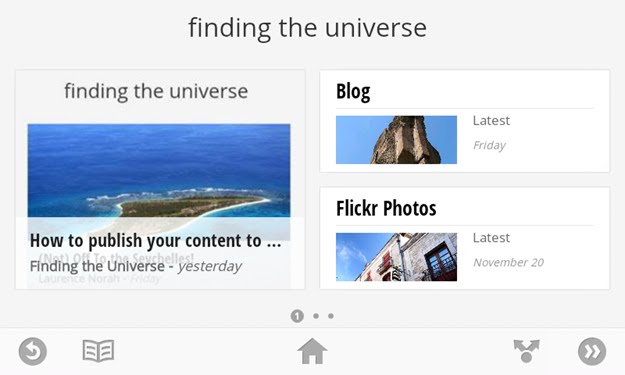
Google Currents is a new product from Google. It’s an application for smartphones and tables running either Android or iOS which allows you to consume content offline in an elegant way – much like Flipboard already does for iOS devices. It’s a bit like an RSS reader, only on some serious steroids.

Google Currents main advantage over a traditional RSS reader is the fact that you can pull content from all sorts of different sources, such as a twitter feed or website, and present it all to your readers in one neatly packaged application.

Google Currents launched with a heap of big name publishers all on board, ready for consumption. But the good news is that Google Currents isn’t an exclusive platform – anyone with content can have it published into the app. And it’s easy to make it look good. In today’s post, I’m going to show you just how you can do that, including how to add your twitter and Facebook pages into your finished publication.

To complete this walkthrough you are going to need a Google account. Since these are almost a prerequisite for using the web these days, I’m going to assume you have one. For publishing content from a website, the overall process is easier if your site is registered with Google Webmaster tools. However this isn’t mandatory, as you can verify your content when you come to the publication step.

Finally, you’ll also need to be using Google Chrome, as Google Currents Producer doesn’t, as of writing, support other browsers (thanks to commenter Rich for pointing this out!).

Note that as of writing the Google Currents application is only available to folks in the US. However you can create content for publication from anywhere, you just won’t be able to read it yourself.

Getting started with Google Currents

Head over to the Google Currents Publisher website, which can be found at: https://www.google.com/producer/home, and sign in with your Google Account.

Next, you will need to agree to the terms of service as a publisher to Google Currents, by ticking the box, and filling in some details, then hitting continue. Once you press continue, you are presented with a screen that allows you to create a new edition, like the one below.

Create a new edition

The only thing you need to fill in at this point is the name of your edition – what your content is going to be called. I put Finding the Universe in mine. Don’t worry about agonising over this too much – it can be changed later.

If you have an RSS feed from your blog to hand, or a Youtube channel, then you can add these at this point. However as all this can be edited from inside the application, so skip those for now and just hit the big Create button.

Create

Some spinning wheels later, and you will arrive at the main Google Currents Producer page, which looks like this.
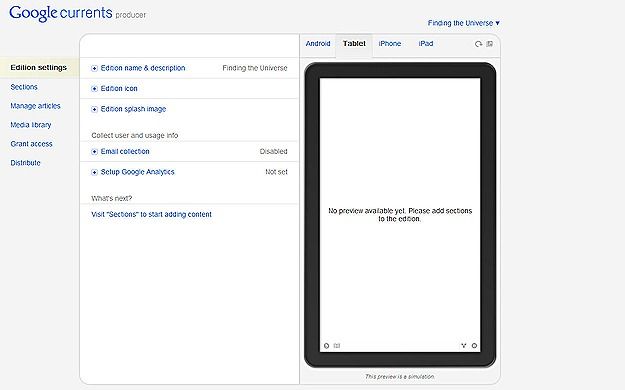
Google Currents main screen

Adding your content

This is where all the magic happens. You will notice a number of menu options down the left hand side. Edition settings, where you will have landed, lets you change things like what your edition is called, should you have messed up in the initial stages.

You can also add things like an icon or splash image for your edition, as well as integrate your product into Google Analytics. All things that are worth doing. But before you start tracking your users, you are going to want to offer them some content! We’ll do that now.

From the left hand menu, select the second option down, Sections.
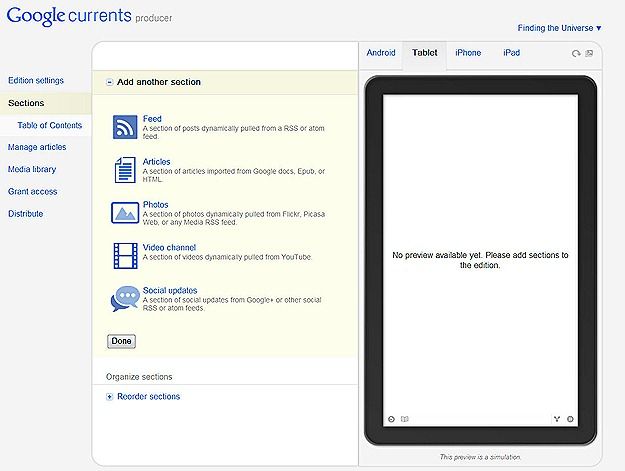
Google Currents sections

Here is where you can add all your content, from RSS feeds to social updates. I’m going to assume to start with that you have a blog with an RSS feed that you want to publish to Google Currents. If you don’t, or want to publish images or social updates instead, you can skip this section, and move down to instructions for integrating Flickr streams, Twitter updates or Facebook page contents.

Adding a webpage feed to Google Currents

Within “sections” on the left hand panel, choose “add another section”, then click the very top option, “Feed”.

You will be presented with the following screen.

add new section - feed

The first thing you need to do is give this section a title. For this example I’ll be adding the feed from this site, my blog. I’m going to imaginatively call this “blog”.

Next, you need to enter the address of your RSS feed. If you use feedburner to manage your feed then the feedburner address will do. Otherwise, look in your blog settings to find your feed URL. Paste your feed URL into the second box.

The last option, “Feed options”, allows you to configure how Google Currents grabs your feed content. If you publish a full feed, then the first option will be fine. If you only publish a partial feed, then the second option, “Generate articles from source url”, is the one to pick.

Here’s what my filled in box looks like. Once you’ve got it all filled in, hit the Create button!

add new section - complete

If all goes well, a box will pop up to say that your feed has been created. You will be taken back to the main page of Google Currents producer where the preview application should have popped up with a preview of what your application may start to look like. You can experiment with the different emulators to see how it renders on different devices, from Android smartphones to iPads, by clicking the tabs along the top right hand side of the page.

You could pretty much finish now – and if all you wanted to do was add your blog feed RSS to Google Currents, then you can skip to the section on publication.

However to do so would be a bit of a shame, because one of Google Currents great features is its ability to aggregate all sorts of your content into one place. Your readers no longer need to access multiple sites to see all the great work you are doing – now they will be able to see it all from one place! Lets assume you have a Facebook page for your blog or product, and add that now.

Adding a Facebook Page to Google Currents

Click the main Sections button from the left hand menu, and choose the Social Updates icon near the bottom.
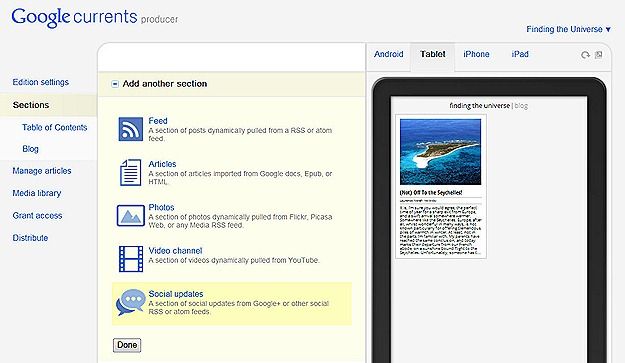
Social updates selection

You will be presented with the following screen:

add new section - social updates

First, you’ll want to give this section a name. As this is a Facebook page, the title Facebook Updates isn’t too bad. Again, this isn’t set in stone, so don’t worry about it too much.

Next, you’ll want to pick your source. From the drop down box, you’ll quickly notice that Facebook Page isn’t currently an option. Nor in fact, is any other social medium other than Google+. Hopefully future revisions of this tool will recognise that there is a social web beyond Google+, but for now, we have to make do, and use the RSS feed option.

Handily, your Facebook page generates an RSS feed of your wall content. To find out the address, head on over to your Facebook page. For me, that’s http://www.facebook.com/findingtheuniverse. Scroll down a bit, in the left hand menu near the bottom should be a “Get updates via RSS” link, as per the screenshot below. You will want to right click that, and copy the link address.
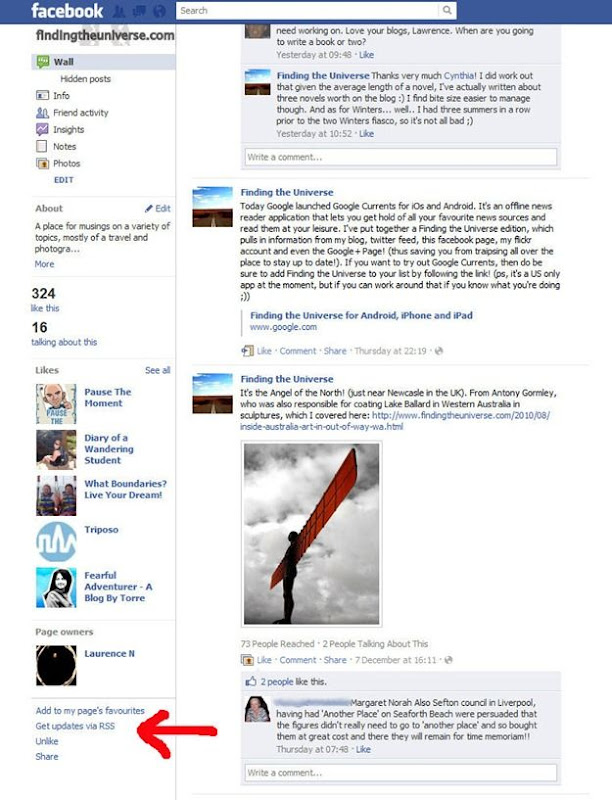
facebook rss feed location

The link should that you copy should look along the lines of: https://www.facebook.com/feeds/page.php?id=128474613858243&format=rss20

Back in Google Currents, you can paste this into the RSS box as follows:

add new section - social updates complete

Once you’re done, press Create, and wait as Currents does its magic.

All being well, your sections should now have at least three parts, a table of contents, a section representing your blog, and one representing your Facebook Page.

Adding other sections is as easy as repeating this process for other content. For a Google+ Page, repeat the process as described for a Facebook page, but instead pick Google+ as the source, and just paste in your profile URL. This works for both Google+ personal profiles and Google + Pages.

Next we’ll add a photo stream to your edition.

Adding a Flickr Stream to Google Currents

Choose “Sections” from the left hand menu of Google Currents, then pick the “Photos” option from the right hand options.

Photo updates selection

You will again be greeted by the now familiar “add new section” box, with a number of photo sources to choose from, including Flickr, Picasa Web and Google Images. To add a Flickr account simply title the section “Flickr” or “Photos”, select Flickr as the photo source, and enter your Flickr username into the user account field.

If you wanted to only have specific content from your Flickr photostream pulled into the application, you could add words into the last box to act as filters. Otherwise leave this field blank to import all your photos. Once you are happy, press Create at the bottom, and let Google Currents do some importing magic!

add new section - flickr photos complete

And that is Flickr. By now you should be getting the hang of adding sections to your edition. You can repeat this process for Videos (which only lets you pull content from Youtube for now).

Adding a Twitter stream to Google Currents

Twitter is perhaps the hardest piece of social content to integrate into Google Currents, largely because Twitter doesn’t make it obvious where the RSS feed of your tweets is. But don’t worry, it is there, if you know where to look.

To add a twitter stream to Google Currents, repeat the process you went through for adding a Facebook Page, choosing Social Updates, and selecting “RSS or atom feed” as the source.

In the RSS feed section, enter the following:
https://api.twitter.com/1/statuses/user_timeline.rss?screen_name=lozula

Replace the “screen_name=lozula”, which is my twitter username, with your twitter username, whatever that is. If it was bob, then you’d have something that looked like
https://api.twitter.com/1/statuses/user_timeline.rss?screen_name=bob

Your finished section should now look like this:

add new section - twitter complete

Hit Create. And that’s twitter added!

Publishing your Google Currents Edition

By now you should have some content added to your Google Currents Edition. Feel free to play around and add more content, or use the sections tool to re-order and edit what you have already added. The user interface is very intuitive, and once you have played with a few things, it should be fairly obvious as to what you are doing.

The next big thing of course is to get your content from draft status out into the real world, in published form, so people can actually read it.

To do this, you need to go to the Distribute menu option, at the bottom of the left hand menu.

Distribute overview

Here you are presented with a number of options. You can test out your app, prior to publication, on either Android, iPhone or iPad, if you live in the US.

If you do have access to the Google Currents App, I’d recommend following the instructions in these sections for these devices to ensure that your publication looks how you want it to. Don’t worry though if you find flaws later on, as you can still edit it after it’s published.

Before you can publish your edition, you do need to verify that the content is owned by you, by choosing the third option down in the distribute section: “Verify Content Ownership”.

Verify Content Ownership

Press the “Verify” link on the right hand side. If you are logged in with the same Google Account that you use for Google Webmaster tools, this should happen seamlessly. If not, you will be redirected to Google Webmaster Central to link the website to your Google Account.

Verify Content Ownership complete

Once verification is complete, Press “Done” on the above screen. This step may not be mandatory.

Once Verification is complete, you will see a screen like the above. Now it is time to Distribute your edition! Note you can only distribute after verification is complete, which may take a little bit of time to happen.

Distribution options

Press “Distribute to Google Currents”. From the drop down section, choose a publication date, and then press publish. (Note, if you are running any kind of adblocking software, you may have problems accessing this part of the process. Disable the adblocker to proceed if you encounter problems). All being well, you will be greeted with the following screen:

Distribution complete

Congratulations! Your content is now available on Google Currents. The link provided is the public link you should direct your readers to to find your content. For this blog, that’s:

 http://www.google.com/producer/editions/CAowl90C/finding_the_universe

Google Currents

I hope you found this tutorial useful! If you’ve got any questions or comments, do post them in the comments below!

Thursday, October 6, 2011

Travel app review: Triposo – guidebook replacement?

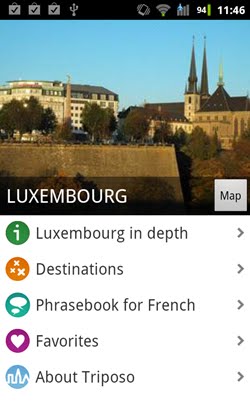
triposo logo 2 On my recent trip to Luxembourg I decided to try out a new smartphone application to get my city guide fix. Triposo is a free download for Android and iPhone smartphones, and it promises to be a travel guide for your phone. I used the Android version for this article.

My usual approach to getting information for a trip is a combination of internet research, guidebooks, the local tourist information office and tips from friends. This time I was going to throw all that out the window and just use one app.

The trip was very short, so the risk wasn’t too great. I was only going to have time to take in a quick walking tour of the city, with a stop off at some major sights. My accommodation was already booked, so I didn’t need to worry about that side of things.

I wanted to know if my phone was going to be able to save me from carrying around the usual paraphernalia that would accompany this sort of wander: that being a map and various leaflets, and present the information in a useful and helpful way. I was also in a different country to my phone plan, and didn’t want to incur data roaming costs, so offline functionality was of paramount importance.

Note I’m not being paid (or rewarded in any way at all!) for this review, I just thought I’d let you know my findings.

SC20111006-114621 How it works

Triposo works by pulling data from a variety of internet resources, including Wikipedia, Wikitravel, Open Streetmaps and ChefMoz Dining Guide. It analyses, combines and categorises this data, then presents it to you in a format that is easy to understand and navigate.

The application is designed so as not to need a data connection once you have started your travels. You just have to make sure you preload the data for the countries or cities you plan to visit prior to your trip. This can result in some hefty downloads, particularly for destinations with a lot of attractions.

What it does well

  • The offline functionality is brilliant, particularly the map. Destinations are labelled by pushpins, with an icon to separate category. If your phone has GPS, your location is also displayed, so you can quickly find the nearest points of interest. You can click on any of these points to be shown the entry for that item.
  • Information for the main sights is, in most cases, comprehensive, and includes photos and history.
  • The application includes a phrasebook for the local language, which in this case was French.
  • As well as cultural attractions, the app includes information on all sorts of things to do, including nightlife, places to eat, shopping, and so on. Maps for each category are available, and some of the entries include contact information and, where applicable, reviews.
  • The interface is excellent, with information presented clearly. This should be a given, but it’s amazing how often a great idea is ruined by a poor interface.
  • As well as the key sights of an area, the app includes information on the history and culture, as well as transport options for getting there, away and around.

SC20111006-114641 Where it falls short

  • The map interface can be a bit confusing, because not everything is displayed at every zoom level. So you might think you are not near anything interesting, but when you zoom in you realise there are all sorts of things around you. (see update on this below)
  • It would be handy to be able to filter points of interest on the map screen by category, so as to display only those things that really interest you. Some filtering is available, so if you are searching for nightlife, rather than attractions, you are covered, however this is not user controllable, should you have a museum fixation for example. 
  • The information is only as good as its sources. If there is no matching entry available for a particular attraction, you’re out of luck. Major attractions in popular destinations are well covered, but that’s about it for now. This is particularly evident for activities beyond sightseeing, such as eating out or shopping, where the entries are in some cases incredibly comprehensive, and in other cases entirely not. Very hit and miss.

Conclusion

For the price (free!), it is tough to argue with this app. I managed to self guide myself around some key sights in Luxembourg with minimal forward planning. I was able to find out a wealth (well, in some cases at least) of facts on what I was looking at, in a device that I was carrying anyway.

SC20111006-114654 The offline map, marking the key points of interest, combined with the GPS functionality, was enough to make this app an essential part of my travellers tool kit. Certainly the information on sights and other points of interest was incomplete, although I would only expect this to improve.

There is a link from within the app to update entries yourself, so with a critical mass of users, this should only get better. Assuming the users know what they are talking about.

Which is of course the main risk of any venture based on crowdsourced data - without dedicated curation, there is the risk of it being incorrect. On the flipside, the data is far more likely to be up to date compared to a traditional guidebook, which can often by years out of date by the time it is published. Plus the sources being used are generally regarded as being reliable.

As of writing, in my opinion, the app doesn’t contain quite enough information to be a proper guidebook replacement. However, as a companion app for your travels, I cannot recommend it enough. In time, I would expect the data to become comprehensive enough that it will be able to save you from carrying around that guidebook tome. With the notable difference that your guidebook doesn’t need charging…

Triposo is available from the Android Market, and iTunes, as a free download. Try it out, and let me know what you think in the comments below!

Update – since this post went live the nice people over at Triposo, who took the time to swing by and pass on their comments on this post, have addressed some of the minor niggles I raised, particularly that of not being able to see everything on the map. Find out more about those updates in their blog post: dots.

Thursday, August 25, 2011

How to find free internet in New Zealand

Sunset New Zealand New Zealand has a lot to offer. Widely available free internet is not one of those things. The reasons for this are naturally cost related, with the cost of providing internet access being a prohibitive factor for most businesses.

This situation is improving, with fibre rollouts planned, but for now, it’s not easy getting your internet fix on.

However, there are a few ways to get free and nearly free internet access if you happen to have a device with wireless connectivity. Having just travelled around New Zealand for a year, here is my quick and easy guide to getting online for as little money as possible.

Free, as in the air you breathe

Genuinely free internet, rather than “free when you buy X”, is hard to find, and not well advertised. Here’s where to look:

  • Public libraries. Most public libraries in New Zealand offer free internet up to a certain usage allowance per day. Whilst the major cities usually have this service available, it can also be found in a wide number of rural locations. For a map of towns and cities with libraries, check out the Aotearoa People’s Network site.
  • Town centres. A tiny number of town centres, including Wellington, Tauranga and Hamilton, offer wireless access for free. Ask at the local iSite (the New Zealand name for a tourist office) for more details.
  • Other public buildings. Some art galleries, museums or other public spaces offer wireless access for free. If you have a smartphone, don’t be afraid to whip it out and do a quick scan of the surrounding area when you are in one of these buildings.

Free if you don’t mind being a bit cheeky

A fair number of locations in New Zealand offer free wireless as an incentive to entice customers in. However, as wireless signals have a tendency to leak out into the surrounding area, you can usually hop on to these networks without having to pay for anything.

  • McDonalds Restaurants. Pretty much every McDonalds in New Zealand offers wireless internet access. Usually you can just wander in and hop on without needing to actually buy anything, although the cookies are normally too tempting for me. You get 50MB of data, and it’s strictly web only – you’ll find your desktop e-mail program will fail to connect for example.
  • Mobil Service Stations. This one has confused me for a while. For no reason that I can tell, a good percentage of Mobil petrol (that’s gas to some of you) stations offer free wireless access, to the tune of 400MB per day. This usually extends all around the forecourt, and as they never have an attached cafe or anything, you can just park up and use it from your vehicle, or wander by and stand under a lamp with your phone. Fuel purchase optional.

Not really free, but you probably wanted a coffee anyway

If you’re in the mood for surfing the web, coffee is a decent accompaniment. In fact, if you are like me, you’ll barely be able to function without the stuff. If you’re going to buy a coffee, you might as well get it with free internet, and a number of coffee places offer this. Usually the networks are encrypted or a voucher code is required – so hopping on without a purchase isn’t possible.

  • Chain Coffee Shops: Most chain coffee stores such as Starbucks or Esquires will give you a voucher good for 50MB / 30 minutes of internet usage if you buy a coffee. Better than nothing.
  • Independent Coffee Shops: Coffee chains are all well and good, but when you are in New Zealand, you really should be visiting the boutique coffee houses, who often roast their own coffee and have some pretty unique blends.

A good percentage of these coffee shops actually offer unmetered wireless access when you buy a coffee – you just need to ask for the code to the wireless network. This is a far better deal than the limited McDonald’s / coffee chain option, and is by far my preferred way of getting online whilst on the road. And the coffee is usually awesome too. Note that this service isn’t always advertised – just ask before you buy.

The other, not free, options

If all of the above seem like way too much effort, and you just want to be able to get online anywhere, cost be damned, then you have a number of options.

If you have a laptop, then pay as you go datasticks are available from the major three mobile network providers, 2degrees, Telecom and Vodafone. If you are going to be in one of the major cities, then 2degrees is likely to be your cheapest option, offering 1GB of data for $20NZD. Otherwise rates for nationwide access are in the region of $10 for 100MB.

If you have an unlocked smartphone, then you can pick up a SIM card for one of these networks and buy a data pack which will let you get internet access pretty much everywhere.

In all my travels around New Zealand using my 2degrees SIM in my android phone, there were few places I couldn’t get an internet connection. Plus, as I can tether my phone to my laptop, I can have the full internet experience wherever I go. The cost of this obviously goes way up if you want to do a lot of photo or video uploading, but for general browsing you should be fine.

Conclusion

One final thing to note for all of this is that the internet in New Zealand is a fairly costly resource for a business to provide, and unmetered plans are fairly non-existent. So the more data that is used, the more the business has to pay. Which explains why it’s so hard to find, or if it is out there, data is carefully controlled. If you do strike it lucky, and find a place with an unmetered connection – go easy on it. Someone is having to pay the bill :)

And with that bit of moral advice, that is pretty much that for internet access in New Zealand. If you’ve got any tips additional to the above, do share them in the comments below!
Today’s post was partly made possible thanks to the generosity of only-apartments, who provided the following text: Have you ever been to Barcelona? If you like the sea, the colours, nice architecture and bohemian ambience, then this is for you. Get your apartments in Barcelona and check it out!

Friday, July 8, 2011

Top Free Android Apps for Travel

android_logo These days a smartphone is becoming as handy a tool for travellers as a laptop or a digital camera, with a massive number of capabilities contained within, from mapping to translation, to data access and beyond.

I’ve been travelling with an Android based smartphone (a Samsung Galaxy S for those of you interested in such things) for a few months now, and have come across a variety of applications that I believe are of tremendous use for the travellers toolkit.

These are all free, or ad supported, although in some cases a “premium” ad-free version can be purchased which either disables the advertising or unlocks additional features. For more on disabling the ads on your phone, see the section on rooting towards the end.

In no particular order, here are my current favourite Android Apps to travel with.

Internet

Opera Mini. When travelling, data use is often something you need to keep an eye on. Opera Mini is a great help in this scenario, as it cuts down on your data usage by compressing everything at the Opera server farm before sending it to your phone, greatly reducing your data consumption. It also has all sorts of handy features such as bookmarks, password management and pinch to zoom, that you would expect from a modern web browser.

Seesmic. The native Facebook application for Android is pretty good, but it is lacking in one key feature – Facebook Page access. If you have a facebook page, then Seesmic is a great way to see what is happening on it. Seesmic also has rather excellent built in support for Twitter, thus killing two social networking birds with one stone.

Miren Browser. Sometimes Opera Mini won’t quite get it right with its compression, or you’ll want to browse the web using the equivalent of a desktop rather than a mobile browser. In these cases, Miren is the answer, with features such as tabbed browsing and a full-on desktop browsing mode. This is good for situations when, for example, a website refuses to render in anything other than a mobile version of the site. I’m looking at you, Facebook Pages.

Dropbox. If you use Dropbox on your computer to back up critical files to the cloud (see my post on data backup for why and how you should be doing this), then the Android application is a great way to get access to these files from wherever you are.

imo / skype. Keeping in touch with people via instant message is wonderful when on the road. Unfortunately, there are a lot of different instant messaging networks, and running an app for every one of these is a bit of a hassle. Which is where the imo app comes in. This supports all the major instant messaging platforms, including facebook, skype, yahoo, aim, gtalk and msn messenger, from one interface. The only thing it won’t do is voice calling, in which case, the skype app is the way to go.

Photography

Camera360. Sometimes you won’t want to lug your main camera around with you. The chances are however that you will have your phone on you most of the time. Sure – a phone camera is probably not going to be producing images that are quite on par with what your camera can achieve, but some picture is usually better than no picture at all.

I use Camera360 for just those moments, mainly because it offers all kinds of features that my standard phone app doesn’t, including image stabilisation and modes ranging from HDR shooting to Tilt shift photography. Worth a look.

News / feed reader

Newsrob. RSS feeds are a great way to keep up with news from all kinds of sites when on the go (including this one). Newsrob is a brilliant app for reading these on a mobile device, and has the huge added bonus in that it allows you to synchronise up to 2000 articles for reading when you are offline. Comes with full Google Reader synchronisation.

Tools

ConvertPad. When on the road you will start to realise that all those units of measurement you had treasured from back home may no longer be quite as universally adopted as you may have thought.

Luckily, ConvertPad exists to help you overcome your problems. Featuring conversions for pretty much every unit type you have ever heard of (and I suspect, quite a few you haven’t) including, crucially, updatable currency conversions, this app is an absolute must have for travelling.

Jota Text Editor. Sometimes we just want to take notes. There are a myriad apps available out there for this, but the most useful I have found to date, with support for a great pile of file formats, is this one. Combine it with Dropbox and you have a fully featured toolset for simple cloud based note management.

Google Translate. Language becoming a barrier to your travelling wants and needs? No worries. Load up Google Translate for instant translation between a whole number of languages. You can even speak into the phone, it’ll work out what you’re saying, and speak it back in the language of your choice. It’s a bit like Star Trek really.

Navigation

Google Maps. Google Maps is, basically, the daddy of free navigation aids on the Android platform. With turn by turn navigation (data connection required) and the power of Google’s Map knowledge, this can get you out of a navigation pickle in no time. And when you arrive at your destination, it’ll even show you a street view picture of where you are supposed to be. Amazing stuff. Preloaded on pretty much every Android phone.

My Tracks. If you are into hiking, running, cycling, or well, anything outdoorsy and map based, then My Tracks from Google is a great way to keep track of your activities. Using your phones GPS and Google Maps, this tool will tell you how far, how fast, and how high you have gone, all presented in a nice handy format that you can then export to Google Maps to share with the world. Pretty cool.

MapDroyd. The one key feature that is missing from Google Maps is a proper offline mode. I suspect that this has to be coming (and the latest version as of writing has a labs setting to allow a limited offline download) as it is about the only thing stopping this from being a full navigation aide. In the meantime, there are a great number of applications that claim to offer offline mapping. Unfortunately these often require the downloading of a large number of map tiles which can make them impractical.

Step in MapDroyd – a very simple application that uses vector based mapping to keep file sizes low. The entirety of the New Zealand road system for example, weighs in at around 20MB. There are some fairly major drawbacks to this application – it has no routing, navigation or Point of Interest support – but if you need a map that shows you where you are and you have no data connection, then this is the app to get. Just ensure you preload the maps for the areas you are going to when you do have a data connection.

Entertainment

Angry Birds. Seriously, where would any list of applications be without this gaming classic? Not every second of our travelling career is going to be filled with moments of incredible awesome, so for those moments of downtime, grab a copy of this gaming classic and while the hours away trying to get three stars on every level. Amazingly, this is entirely free on the Android platform, as are the sequels, Rio and Seasons.

RockPlayer. Many Android phones are more than powerful enough to be used as video players. Rockplayer is a handy application with support for a vast array of file types, so load up your phone with a few classic movies and use this to watch them with.

Miscellaneous

Rooting. You may have heard people talking about rooting their Android phone. Essentially, this is a way to get full administrator access of a phone. Doing so opens up a whole number of doors, including the option to install custom ROM’s.

There are a number of advantages to doing this, not least being that a number of apps won’t run without super user, or root, privileges. Additionally, it means you can install the latest version of the Android operating system – usually bringing a host of new features – without waiting for your phone manufacturer to do so.

Rooting a phone can be a complex and risky affair, with the serious potential to cause it to stop working, so I’m not going to go through the steps here. If you are interested in rooting and custom roms, then I can highly recommend checking out the Cyanogen Mod website and seeing if your phone is supported.

If you do successfully root your phone and install a custom ROM, you will have access to handy features such as tethering (sharing your phones data connection with your laptop), as well as being able to install application such as Titanium Backup (application backup and restore functionality) and AdFree, which will disable all the ads on your phone, and reclaim valuable screen real estate.

Google Sky Map. Stars are awesome. Staring up into the night sky somewhere like the Australian outback is an experience that has to be seen to be believed. Not too soon after you have stared up, and had the inevitable conversation about the potential for alien life, you will probably find yourself wondering which star is which, and how to recognise constellations.

Google Sky Map is your friend in these situations, allowing you to become a expert on the sky in no time, particularly because when you point your phone at the sky, the exact stars you are seeing appear on your phone screen, with names and lines attached. This is one of those amazing show off apps, which has to be seen to be believed.

Google Goggles. Google has some seriously clever people working for them. Goggles is an example of what clever people can come up with.

Take a picture of something with your camera in Google Googles, and it will send it off to the Google servers which will analyse your photo and come back with all kinds of information on the subject at hand. This works well for things like landmarks, bottles of wine, books and Sudoku puzzles, and not so well on people. Give them time.

Prey. Last on my list of incredibly useful Android apps for travellers, but by no means least, is the almost mandatory installation of an anti-theft program.

Whilst there are many on the market, Prey offers free monitoring and tracking for up to three devices, and if the worst should happen, and your gadgets are stolen (or mislaid), then you can remotely activate Prey via a web page from any computer, and locate / wipe your stolen device.

This is one of those tools, like backups, that we only consider using after we have lost something or had it stolen, so don’t delay, and install it now.

Well, those were my favourite Android apps for travelling. If you’ve got apps to share that you can’t travel without, please do share in the comments below. Also, I'm sure that equivalents for most of these apps are available for iOS based devices, so do shout if you have thoughts on that platform.

Thursday, February 24, 2011

How to increase your Alexa rank

Alexa Alexa is a widely used metric for measuring a website’s popularity. Websites are assigned a score, which starts at 1 for the most popular (currently Google), and then increases in number as sites are deemed to be less popular.

Today, in one of my rare technology themed posts, I’m going to share some thoughts and tips on how you can improve your site’s Alexa rank.

First though: what is Alexa rank, and why is it important?

Why is Alexa rank important?

Alexa rank is one of the metrics that is visible to the outside world as a measure of how popular your site is. It is but one of many metrics, alongside ranking data such as Google’s Page Rank, which measures how important Google thinks your page is, and Compete, a US only measuring standard.

Alexa is important because it demonstrates to others what your site is worth in a relative sense, which is particularly useful when you want to negotiate a deal with advertisers, or if you are trying to demonstrate your value to a third party in exchange for a product or service.

How does Alexa rank work?

The Alexa score for a website is calculated over a three month rolling average, with a numerical score given. You can also visit the Alexa website for a one month average, however this is more liable to fluctuate. The score is updated usually daily, although this is not always the case.

Alexa rank is calculated in a number of ways, although accuracy becomes much reduced outside of the top 100,000 sites.

The main way that Alexa rank is calculated is via users of the Alexa toolbar. This is a software addon to a users browser that tracks all the sites a user visits. This data is then aggregated and a site score is allocated based on visits.

Obviously, this toolbar scheme contains a number of flaws. Only users with the toolbar installed will provide traffic data to Alexa, which will skew the results towards the browsing habits of a certain segment of the population. That segment of the population is the one which has an interest in Alexa rank – there is no other good reason to have the toolbar installed. Luckily, this means that the system can be gamed – to a point of course.

As well as the toolbar Alexa state on their website that they obtain traffic data from ISP’s and other sources. This is less relevant to the article as it is not something you entirely have direct control over.

How do I increase my site’s Alexa score?

Enough, already, with the description of what Alexa is, and how it works. Clearly, you want to know how to get your sites score from it’s current rating up into the top 100,000.

There are a number of ways to improve your Alexa score, and they work by attracting people with the toolbar to your site. Obviously, it would be nice to attract more people to your site anyway, because hard traffic numbers are the most important statistic, but as Alexa rank is externally visible, that is what we will focus on improving, and the easiest way to do that is by registering hits on your site from people with the toolbar installed.

As a web site owner, there are two major tactics you can use to improve your rank.

Tactic One – Use the toolbar

The first thing you should do if you want to improve your Alexa rank is install the Alexa toolbar. If you are using Google Chrome, this comes as an extension which is only a button wide, so hardly takes up any space. Obviously there are privacy implications to installing a toolbar which tracks your usage across the whole web, but that would appear to be a concession you will have to make.

Once the toolbar is installed, browse your site as you would normally do, attempting to visit it at least once a day, and visiting more than just the home page in the process. This will keep the page views and bounce rate statistics looking good.

By just employing this tactic, and not even engaging with the rest of the Alexa using world, you will be able to easily get your site into the top million – 750,000. Clearly, this is not a system without flaws.

Tactic Two – Attract other toolbar users

After installing the Alexa toolbar, you will find that however frantically you click around your site, you still won’t be edging much higher than 500,000 in the scores. Presumably Alexa corrects for one toolbar user being obsessed by a site and normalises the score. In order for your rank to keep ascending therefore, you will need to attract other Alexa toolbar users.

To do this, you need to work out who the other Alexa toolbar users are. The answer is, fairly obviously: other website owners who are interested in their Alexa rank. Your average internet user who doesn’t run a website has no real reason to have the Alexa toolbar installed.

You need therefore to provide content which is interesting to other website owners. In an ideal world of course, all your content will shine, and visitors will flock to your site like magpies to tinfoil, toolbar users and not alike.

In a less than ideal world, this may not be the case. More targeted posting is likely to be required.

In my case, I am a part of the wider travel blogging community. I am aware that Alexa rank is something that travel bloggers are pretty interested in, so I am fairly certain that most other travel bloggers will have the toolbar installed. As I already write about travel, this is the segment that I would most likely be interested in engaging with on my site, as we are already in the same niche.

To improve the Alexa rank of this site therefore, I need to engage with the wider travel blogging community, and give them a good reason to visit the site. Here are some ideas for how I could do that, which you should be able to apply to your niche as well.

Provide information on subject matter that is highly valuable to travel bloggers

This is probably the best way to attract toolbar using readers. If I were, for example, to run an article with information on how to make a guaranteed return on travel blogging, I suspect I would be fairly inundated with interested travel bloggers. Sadly, I haven’t worked that one out yet. But you get the idea.

The important thing with this approach is to be sure that your information is solid and valuable. Snagging people with a snappy headline and then failing to deliver the goods is a sure fire way to rile people up. Also, you don’t want to be straying too far from your regular posting theme, or your every day readers may start to wonder what the hell you are going on about.

Run posts that encourage discussion, to pull people in from the RSS Feed

Another number that website owners like to keep an eye on is the subscriber count to the site’s RSS feed. Subscribers are people who have committed to receiving every article via their RSS reader or e-mail client, which means that in many cases they don’t actually visit your site.

Whilst it is obviously brilliant that folk are willing to read your content regularly, from an Alexa perspective this means that you are not getting hits. And I would suggest, with roughly zero evidence to back me up, that a lot of travel bloggers consume content in this way, because it is a lot easier than clicking around hundreds of sites. Certainly I do.

To pull people in to your site therefore, you need to give them a reason to actually come by and visit your site. A good way to do this is to run a post that encourages discussion, that makes people want to drop by and share their opinion. Additionally, you could implement a comment system like CommentLuv, which rewards people for commenting on your site by linking to their most recent article.

There is a balance to achieve here – you don’t want people commenting just for the sake of it, but you do want people to swing by. Try it out with an open ended post to foster discussion, and see what happens.

Publish a round up of top travel posts from around the web on a regular basis.

There are a myriad of great travel bloggers out there, producing great content. It may be that my readers don’t spend quite the same amount of time that I do wandering around the travel blogging sphere, but it may also be that they enjoy reading the same sort of thing that I enjoy reading.

Doing a regular round up of my favourite content from like minded travel bloggers is a great way to drive toolbar touting traffic, and it has the added bonus of bringing content to my readers attention that they might not have otherwise seen. This is a win-win scenario – other bloggers will drop on in to see what sites you have chosen, those sites will gain an increase in traffic and recognition, and your readers will have more content to read.

Again, this is an area you need to approach with care and consideration. You really do need to put some work in to picking your favourite reads, as picking a random selection of articles is going to be doing a disservice to your readers, and in the long term, no-one will care about your selection. A list is only as good as it’s curator and content.

Run interviews with fellow travel bloggers

This is a bit like the list idea, only of a more focused nature. Interviews are a wonderful way to reach out to a wider audience, exchange links, and build connections. Again, this works positively both ways, the interviewee gets to spread the word about their blog, the interviewer gets some great content and potential traffic from the interviewee.

Interviews are an interesting way to provide additional content to your blog, and with the right questions, you can pull out information that is really useful to your audience. I’ve had great success with my series on travel blogging tips for example, where I’ve been interviewing successful travel bloggers for their tips on running a great site.

Run competitions with relevant prizes


Competitions are always a fun way to engage with your audience. But before you start to panic about not being able to afford the prizes, consider what is of value to other travel bloggers. Sure, offering an all expenses paid round the world trip is going to get folk interested, but it may be a touch out of your price bracket.

One form of currency that is bound to be of interest is traffic and publicity. Offering the simple prize of a re-tweet and a stumble to the winner of your competition, or even to all the participants, is the sort of thing that will really interest your target audience. Again, this works two ways – you get toolbar traffic, and your toolbar traffic gets recognition and visitors. The more successful and influential you are, the more valuable this will be.

The downside to this sort of competition is that regular readers who don’t run their own site may not find the prize too desirable. Achieving a balance is key.

In conclusion

Well those are my thoughts on improving your Alexa rank. This is a fairly long term strategy, and isn’t something that will happen overnight. Additionally, the system can only be gamed to a certain point, beyond which you are likely to want to focus on actually building traffic!

A key thing to realise with all of these tips is that no-one likes to feel used. If folk feel that you are just using them to increase your Alexa rank, you run the risk of the reverse happening.

The positive thing about my suggestions is that they are a two way street. You get a little kick back in terms of Alexa rank increase, and the community around you gets the pleasing glow of recognition, as well as valuable information that they can go out and use.

My final words of advice – increasing your Alexa score should always be the secondary goal to any piece you do. First and foremost you should be producing good content, engaging with and promoting others in your niche, and interacting with your readership. If you do these things, then your traffic and associated rank will grow naturally, over time. The primary goal of your website is probably not (well, hopefully anyway) to have a high Alexa rank, so try not to lose sight of that.

 
Bloggers - Meet Millions of Bloggers